Tubeless tires have become an essential for modern cyclocross, gravel, and mountain bikes. While some tubeless tires can be seated using a floor pump, using an air compressor is the "easy button" method.
It's now possible to get a full home workshop compressor setup for working on bicycles for about $200, making it within range of the home mechanic. In addition to their usefulness on tubeless bicycle tires, owning an air compressor has many other household uses, and adding one to your home workshop is more realistic and useful than ever.
In this article I'll share with you a shopping list to create your own home compressor setup, and step-by-step instructions for how to use it for bikes.
Why you want an air compressor in your bicycle workshop
Sometimes, when installing tubeless tires, the beads can be seated using a floor pump. It varies quite a bit based on the tire, rim tape, and rim. More stubborn tires or tricky rims need more consistent, higher-pressure air to seat the beads. Bike shops and pro mechanics use compressors for this purpose, and so should you.
A shopping list - what to buy:
Let's go shopping! Here's what you need:
|
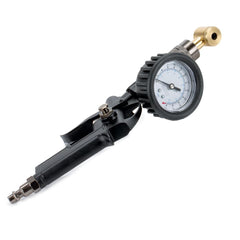
Prestaflator inflation tool for bikes This is the "magic" part that converts the fitting on an air compressor into a presta or schrader valve that works on your bikes. If you aren't sure which is best for you, I recommend the Prestaflator Professional, VIAIR TLC, or Arundel Shop Inflator. |
||
|
Arundel's Presta Shop Inflator |

Prestaflator Professional |
VIAIR TLC ($69.95) |

The air compressor itself:
For bicycle use, small capacity 2 or 3 gallon models work fine. Shops might want a larger capacity model, so the motor runs to refill the air tank less often, and you can work on many wheels in a row without waiting for the compressor to recharge. This is less important for home users who will rarely need that type of capacity.
I use this model: https://www.lowes.com/pd/Kobalt-3-Gallon-Single-Stage-Portable-Electric-Hot-Dog-Air-Compressor/1000258241 from Lowe's:
 (scroll down further for a full list of recommended compressors, below)
Pneumatic lines:
A starter kit like this one includes both the air line and all the 1/4" I/M fittings required to get things hooked up. 1/4" I/M is a common size used on smaller compressors for home use. It's nice to get the hose that coils up automatically to keep things organized in your shop. You can buy the lines, fittings, and accessories separately, but this kit is super economical and has everything in one box.
To keep it compatible, look for equipment with the 1/4" I/M type connector to ensure everything matches up. This connector is used on many compressors, air lines, pneumatic power tools, and most importantly, it's also the connector used on almost ever bicycle inflator, including the VIAIR TLC, the Prestaflator and Arundel inflator tools.
How to connect the air compressor, pneumatic lines, 1/4" I/M fittings, and bicycle inflator tool
It should go without saying that you should wear eye and ear protection before using power tools. Please do so, then:
- Turn off the compressor
- Install a male 1/4" I/M fitting into one end of the new air hose (if it didn't come with one already installed). Install some PTFE thread-sealing "plumber's tape" (note: this is Teflon tape, not the metal tape used for working on water heaters!) on the threaded interface to help it stay airtight before you screw them together. The PTFE Teflon tape comes in the "starter" kit mentioned above if that's what you purchased, if not, purchase separately.
- Plug the end of the air hose with the new 1/4" male fitting into the compressor. Compressors typically have a "pull/push" fitting, you pull back a retaining ring, shove the connector in, and then release the ring to lock it in place.
- Install a female 1/4" I/M fitting into the other end of the air hose, again, use plumber's tape to get a tight seal.
- Your new Prestaflator or Arundel Inflator has a 1/4" I/M fitting already fitted; plug it in to the newly-installed female end of the air hose using the push-pull connector.
- Plug the compressor into the wall outlet and turn it on, the motor will run as the tank begins to fill.
- Check for leaks on your newly-installed connectors, and adjust your fittings if needed.
- When the motor stops, the compressor is full and ready for use.
- Point your inflator in a safe direction and squeeze the trigger to test it.
How to use the air compressor for tubeless bicycle tires
Consult the owner's manual for your specific compressor, but generally compressors have some features in common. You'll usually find a regulator to control the PSI output - turn it to an appropriate PSI for bikes - you might start with 40 PSI to begin and go higher if needed later. Higher PSI settings can help seat stubborn tubeless tires.
Open the presta valve and hit it with the inflator tool. With a little luck, your tubeless tire beads will jump right into place with a satisfying "pop", but if not, check this article for some additional steps to take.
In addition to seating tubeless tires at installation time, you can of course use a compressor for your daily "top-up" inflation needs. Some of the Prestaflator inflation tools have a built-in pressure gauge you can use. If your inflator doesn't have the gauge, use the regulator on your compressor instead.
Other uses for air compressors
Once you've got your compressor setup, you can easily remove the Prestaflator Inflator using the quick-release I/M fitting to install other tools. Compressors have a variety of uses beyond bicycles, including:
- quick cleanup of dust with a blower tip (a blower tip is included with the "starter kit" mentioned above)
- airbrushing artwork
- inflating car tires
- powering pneumatic tools like an nail or staple gun for construction or remodeling projects
- inflating pool toys
Compressors are quite noisy and can bleed air slowly over time, which means the motor will turn on to refill the tank periodically. So you'll want to turn it off when not in use. Be a good neighbor!
Recommended air compressors for home workshops
Home users should consider a small, compact, and inexpensive air compressor if they plan to work on bicycle tires. Many of even the smallest compressors have plenty of volume and pressure to get your tubeless tires seated and to handle your day-to-day inflation needs. For home use, a "hot dog" or "pancake" (named for the shape of the tank) compressor with a 2-8 gallon tank is great.
This is the model I personally use. As of this writing it sells for $129.99. The 3 gallon tank is a great size for the home user. It's small enough to lift, alone, into the trunk of my car for events, and doesn't take up too much space in the corner of your workshop. It's even small enough to sit on top of a workbench.
For a little more money ($169.99) you get a larger holding tank, so the motor runs less often. The other features are similar if not identical. This might be a nice choice if you work on many bikes at the same time, or if you plan to use the compressor for home improvement tasks, like powering air tools like a nail gun.
Recommended air compressors for teams, pro mechanics, and bicycle shops
Bicycle shops and teams who work on multiple bikes all day long will be better served by a larger volume compressor. Same applies to pro mechanics - time is money. While the fittings and capabilities will be the same, a larger tank means you can do more inflation between recharges. When an air compressor recharges, the motor runs to fill the tank, which is noisy. This is annoying in retail bike shops, so buying a compressor with a larger holding tank allows you to minimize that noise, charging it before or after hours when customers aren't around.
A good choice for high-volume shops. In the $300 range you're getting a much larger tank than the consumer models designed for the home, and wheels with a handle so you can wheel it around the shop or take it to events. Shops may also consider wheeling the compressor into the "back alley" during the workday, then running pneumatic lines back into the shop, to help control noise.
As of this writing, this air compressor sells for about $700 - a serious investment. What you get for your money is a massive 30 gallon tank (large enough for significant inflation before the motor needs to recharge), and construction intended to stand up to pro use at job sites. Like the Kobalt 20 gallon model, it's on wheels for easy transport. The big selling point here is the long-term ability to maintain and service the air compressor, instead of throwing it away as it wears.
Air compressors to avoid
I recommend staying away from compressors with these characteristics:
- There's nothing more frustrating than a broken, useless tool. I recommend avoiding so-called "no-name" models. While they may work initially, very cheap tools typically don't last very long. Buy something from a major name brand for longevity.
- Low PSI models are problematic for bicycles. While a car tire might take only 30 PSI, a modern road bike wants 100 PSI or more, depending on the rider. Choose a model that has pressure to spare (for example, a 150 PSI rated model if you plan to inflate to 100 PSI) so it can easily and quickly reach your desired PSI. A model rated only for 75 PSI may not be enough for bicycle work.
- You should also avoid "tankless" compressors. You may see these at the auto parts store; they often plug into the cigarette lighter and are designed primarily to inflate car tires (slowly). While they may work fine for automotive use (or inflating pool toys) they lack the capability to provide a blast of high-volume compressed air, since they don't have a holding tank. We need that "blast" to seat tubeless bicycle tires, so buy a compressor with a separate holding tank.
Choosing the right inflator head
Inflator heads range from basic to deluxe and sell for about $30 - $150, depending on features. These models all feature trigger control, so you can vary the amount of air dispensed, and use the common 1/4" I/M air compressor fitting. Some models work on both presta or schrader valves, while others only work on a single valve type. Check your bike(s) to make sure your air tool matches your valves.
Cheapest presta valve adapters for air compressors
The cheapest presta inflator adapters for air compressors start at $36.95. Prestacycle's Prestaflator Mini has no extraneous features, but offers an all-metal design that can be operated one-handed. It doesn't have a pressure gauge built-in.
If a built-in gauge is desired, the Prestacycle Prestaflator Eco adds a built-in pressure gauge for a couple extra dollars and works great for casual use.
Best value presta valve adapters for air compressors
Two popular mid-range inflator adapters for air compressors sell for about $60. These tools are an excellent balance of price and performance, great for most home mechanics.
If you only want to work on bikes with presta valves, check out the Arundel Shop Inflator. It has a reliable gauge and simple design that can be used one-handed, which is convenient.
Prestacycle's Prestaflator Professional inflator offers the ability to handle both schrader and presta valves, plus includes accessory tips, handy for inflating pool toys.
Deluxe, high-end presta valve adapters for air compressors
Deluxe, high-end presta valve inflator adapters offer additional features and functionality. They are ideal for heavy use, shops, teams, and enthusiast home mechanics who want to get the most out of their tools.
The two most popular inflators in the deluxe category are Prestacycle's Prestaflator Digital and Park Tool's INF-2. The Digital model from Prestacycle offers the same features as their professional model, but adds a built-in, backlit digital PSI gauge, which is nice to read in dark garages or basement workshops.

Seating a tubeless tire without an air compressor
Sometimes you don't have access to electricity needed to operate an air compressor. In that circumstance, consider an alternative like the Airshot air tank. It can be filled using a basic floor pump, making it ideal for campgrounds, race parking lots, and other areas where you can't plug in a compressor. Airshot delivers a blast of compressed air to help seat your tubeless tires.
Next Steps
With the steps outlined in this article, I hope you're able to setup your home air compressor with ease. Let me know your feedback or questions using @RideCX on social media or call/text me directly (909) 283-3391 and I'll be happy to help.